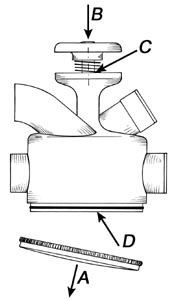
Checking and maintenance of the Free Flow valve
|
The following steps should be undertaken on a clean soft surface, like a soft cotton cloth or houshold cleaning paper.
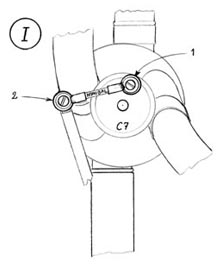
1) Unscrew the Minibal joint (schematic I - 1 or 2) from the C7stop-plate. In order not to spoil the original screw, the use of an appropriate screwdriver is recommended. When needed, hold the the lever away from the stop-plate not to interfere with the disassembling of the valve.
|
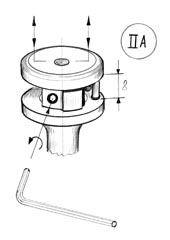
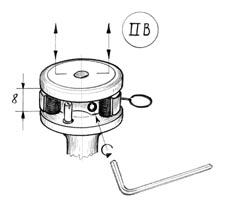
2) Unlock the stop-plate C10 screw with a fine quality 2 mm. Allen wrench key by turning 45 degrees counterclockwise (schematic II)
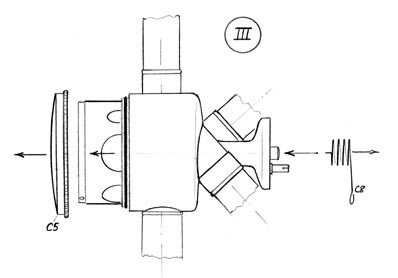
3) Slightly pull the the C7 stop-plate upwards and remove the valve spring (schematic III/c8)
4) Unfasten the C5 cap to remove delicately the rotor (schematic III).
5) Clean the rotor in lukewarm water to which you may add a few drops of dish soap. Rince it off thoroughly to disolve all remaining oil. Wipe to dry with household cleaning paper.
6) Wipe off the inside of the valve casing with householdpaper.
|
IMPORTANT : never use sand-paper, steel-wool, Scotchbrite or any abrasive material. Do not attempt to clean the hole of the stem.
WARNING : IF YOU SPOT ANY TRACES OF VERDIGRIS IN THE DUCTS, THE CASING OR THE WRAP(S), IT IS TIME TO HAVE YOUR UNSTRUMENT OVERHAULED BY A BRASS TECHNICIAN FOR A CHEMICAL CLEAN-UP !
|
7) When all surfaces are clean (the overall dark brown colour is normal), replace the rotor in the casing. Make sure it is well centered, and do not add oil at this point.
8) While holding the instrument with the casing facing upwards, action the rotor back and forth by twisting the stem.The valve should move freely inside the casing. If not, please refer to our list of occuring problems and tips below.
9) Apply a good dozen of drops of valve oil inside the casing, plus one drop on the emerging part of the stem.
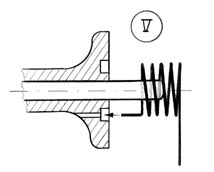
10) Set the instrument on its bell, making sure the rotor does not drop and reset the C8 spring by fitting the blade inside of the dedicated notch (schematic V)
11) While maintaining down the rotor inside its casing, reset the C7 stop-plate, making sure the screw is in line with the flat part of the stem. Check that the sping C8 is secured inside its notch, push the stop-plate at his right level in and tighten the screw (schematic V) . At this point, the valve should rotate freely and spring back into place. The spring has two distinctive functions :
it upholds the rotor constantly against the bottom of the casing, ensuring utmost tightness (schematic IV).
it powers the backwards revolving action.
12) Reset the C5 cap on the casing. If too hard, lightly lubricate the "o" ring with silicone oil (or tuning slide grease). If too loose, the ring might be too greasy or too old.
13) Connect the Minibal assembly.
|


|
Problems that may occur
- The spring back action performs poorly :
A) Minute particles remain inside the valve. Repeat points 1) to 11)
B) Verdigris obstructs proper rotation. The cause is most likely unproper lubrication. Removing it requires a chemical treatment. Your therefore need the assistance of a professional brass technician.
C) The C8 spring is damaged (broken, modified, distorted, loose, etc.) or not fitted properly.
D) The casing has been dented. The assistance of a professional brass technician is required. This may involve the replacement of the valve.
- The rotation angle does not correspond to the guiding marks :
A) The Nitrile or cork bumpers need adjustment or replacement.The assistance of a professional brass technician is required.
B) The stop-plate has not been fitted properly. Check if the locking screw is tightened as required on the flat part of the stem (point 10).
Tips for the professional brass technicians
Most chemicals commonly used (like Cuproten 1+3 in water, sulphuric acid 1+9 in water, etc.) work well to remove verdigris from the Free-Flow valve. Although the stem is made of stainless steel and normally endures standard treatments, it should not be immersed longer than necessary.
Please note the centering hole of the stem has been accurately calibrated and polished during production. The stem may be considered as the spinal column of the valve. You should therefore never attempt to undertake any modification of its critical and capital adjustment.
When lapping is necessary, you may use extra fine grade abrasive, such as Clover 600 or 800, or very fine powder grindstone (grade 10/0) mixed with silicone oil or tallow. Avoid letting it penetrate the hole of the stem. Rice thouroughly and remove all chemical before lubrication.
|